
Most of the great discoveries of astronomy, by Galileo and his successors, were made using telescopes which were very small by modern standards – though they also needed keen eyesight and a great deal of patience. Many people imagine that big telescopes are required to see anything worthwhile, so they never make the attempt, while many others (especially children) expect far too much, too quickly, and are unnecessarily disappointed or even put off. If used properly a small telescope can show a great deal: Galileo discovered the star clouds of the Milky Way, the mountains and craters of the Moon, the phases of Venus, the moons of Jupiter and the rings of Saturn (though he didn’t realise what those were). But he also discovered sunspots, and as a result of looking directly at the Sun, he went blind.
Rule no.1. NEVER, NEVER, NEVER look at the Sun through optical instruments of any kind.
The human eye just can’t cope with light and heat in such concentration. A small telescope will show single sunspots or groups, especially when the Sun is most active (it’s in an intermediate phase at present), but the only safe way to look for them is by the technique known as ‘projection’. This involves placing a piece of white paper or card behind the telescope, when it’s pointing at the Sun, and focussing the instrument until a sharp image appears. It’s not an easy trick to acquire, especially if the telescope is sufficiently powerful for only part of the Sun’s disc to be projected at a time, and first there’s the problem of lining the telescope up with the Sun without looking through it. It’s frustrating till you get the knack, but at all costs resist the temptation to look through the eyepiece or even through the finder, if the telescope is large enough to have one.
A practical detail seldom mentioned is that small telescopes don’t cast much of a shadow into which to project an image. If the sunlight is concentrated at the eyepiece, the much larger projected image is of course fainter than normal sunlight and is easily washed out. Be prepared to rig an extra shade to darker the screen; if the telescope throws the image to the side, as in a Newtonian reflector, then the image may have to be projected into a. box.
The Moon

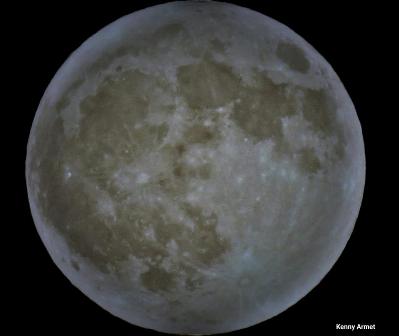
The Moon is big enough and close enough to us to show a great deal of surface detail with small instruments. Even with the naked eye we can see the Maria, the dark plains making up the face of the Man in the Moon: from returned samples and from spacecraft photographs, we now know that these are great flaws of basaltic lava, and far some reason there are very few of them on the side of the Moon facing away from the Earth. With good eyesight, at Full Moon at least three big impact craters (Copernicus, Tycho and Kepler) are made visible by the bright rays of ejected debris which surround them.
The rays are almost the only fine detail which is prominent at Full Moon. The mountains and craters which cover the lunar surface are best shown up by the shadows cast when the Sun is low in the sky there (which is why the Apollo landings were all made soon after lunar sunrise). The greatest amount of detail therefore shows near the terminator – the boundary between light and darkness. In the first few days of the month the shadowed part of the disc is faintly lit by earthlight, traditionally ‘the old Moon in the new Moon’s arms’. As the month wears on and the terminator advances to the left (as seen from Earth’s northern hemisphere), fresh details continually became visible while previous ones merge into the moonscape as their shadows grow shorter. Beyond Full Moon, the progress of sunset is well worth watching as the Moon wanes, because the view is quite different when the sunlight comes from the opposite direction.
A great deal can be seen with small instruments: Galileo’s Moon maps were surprisingly poor, but subsequent observers mapped the Moon in detail and laid the basis of present nomenclature with instruments which were very small by today’s standards. (To have a feature on the Moon named after you, you have to be dead, and to have a major contribution to science – Julius Caesar is on there for reforming the calendar, not for his military exploits.) A good exercise is to take a defined region like Mare Imbrium (the Sea of Rains) and work round it, identifying features like the Alpine Valley and the Bay of Rainbows, to see how much you can see. Something else to watch for is the process of libration, an apparent slow rocking motion – actually an effect of slight variation in the Moon’s distance – which allows us to see some way round to the Farside of the Moon.
See also: Astronomy Beginner’s Guide Part 4: The Moon
Small telescopes (by today’s standards) would be the wonders of the world if they were taken back to the time of Galileo, or Sir Isaac Newton. But they need a great deal of patience, if you want to see anything of the planets with them, and first you have to learn the constellations so that you can recognise the planets among them.
The Planets

Mercury always stays close to the Sun, so usually when it’s visible in Britain it’s in the morning or evening twilight. Quite often it has to be found with binoculars before a telescope can be aimed at it. A small instrument will show Mercury as a disc, possibly even make out phases, but only large telescopes can pick out markings.
Venus is larger than Mercury and often nearer to us, so its phases are much more apparent – there’s some evidence that very sharp-eyed people can see Venus as a crescent. Unfortunately there still aren’t any markings to be seen, because Venus is completely covered in cloud. We know now that Venus isn’t romantically covered in water, and the clouds aren’t like ours at all – they’re sulphuric acid smog. But that can’t take away the sheer beauty of the planet – seen from this distance!
Because Venus and Mercury are closer to the Sun than we are, they are confined to the morning and evening skies. The outer planets can be seen at any time of the night, but are at their closest to us when they’re at opposition, due south at midnight (GMT). As the Earth overtakes them, the outer planets each seem to trace a loop in the sky over a period of weeks. (The inner planets do that too, as they overtake us, but it’s easier to follow against a dark sky.) It’s just an effect of perspective, but to realise that you have to admit that the Earth is moving – a step whish the great minds of the ancient world found too hard to take.
Of the outer planets the only solid world visible to the naked eye is Mars, which comes closer to us than any other planet except Venus, and then is brilliant in the midnight sky. Unfortunately Mars is too small for much detail to be visible, even with fairly large telescopes. You might manage to glimpse the polar ice-caps, or even the most prominent dark marking, Syrtis Major, but very good conditions are needed.
Because of the layout of the Solar System, with a great gap containing the Asteroid Belt between the orbits of Mars and Jupiter, the five solid planets counting the Earth and Moon are sometimes referred to confusingly as ‘the inner planets’, although only Mercury and Venus are ‘inner’ with respect to the Earth. But Jupiter, Saturn, Uranus and Neptune, the four gaseous worlds, are very much ‘outer’: Jupiter, the innermost of them, is five times and more further from the Sun than we are.
Even with his first small telescopes, Galileo was able to see that Jupiter is a very remarkable world. Because it’s so far out from the Sun we always see it in full phase, but it’s obviously flattened at the poles because of its rapid rotation. To see the bands of cloud parallel to the equator, or discrete features such as the Great Red Spot, would need a larger instrument – a three-inch refractor or a four-inch reflector, at least.
Galileo’s other major discovery, however, in relation to Jupiter, was the four large satellites which are now called ‘the Galilean satellites’ in his honour. Their importance was that they were obviously going round Jupiter, so enabling Galileo to state that all bodies in the Universe didn’t revolve around the Earth. I’ve met an observer who had made a study of them with an old naval telescope, not intended for astronomy at all; the outer two at least can be seen even with binoculars. They would all be visible to the naked eye but for the glare of the planet, and my first wife, who had very keen eyesight, could prove by drawing their positions (which vary from night to night) that she could see at least three.
The moons are called Io, Europa, Ganymede and Callisto, in order outwards. In the size range of the Moon and Mercury, they are worlds in their own right and we know from the Voyager probes that they are mini-planets. Io has huge active volcanoes and fields of sulphur; Europa is covered with ocean, under a cracking crust of ice; Ganymede and Callisto are cratered, but show signs of crustal activity caused by the tidal pulls of the other moons, and they too have now been found to have liquid water within them.
When Galileo turned his telescope to Saturn, he was extremely puzzled. He was unable to resolve the rings clearly but could see that there was something very odd about the planet. Could it be triple; and if so, how could two such huge satellites apparently remain motionless? Even stranger, after a few years the oddities on either side of the planet ‘disappeared’. “Has Saturn devoured his own offspring?” wrote Galileo in bewilderment. What had happened, of course, was that the Earth was passing through the plane of the rings and they were edge-on to us, as they were more recently in 2009. At present, therefore, the rings are well presented and even a small telescope should show some indication of them.
Saturn’s moons are small and hard to see except for Titan, once thought to be the largest moon in the Solar System but found by Voyager spacecraft to be slightly smaller than Jupiter’s Ganymede. Saturn is a long way out, however, so a fair-sized telescope is needed to see Titan.
Although much further out, so that only Voyager 2 has been there and only very big telescopes can see features, Uranus and Neptune can be seen with small instruments, even binoculars. It’s important to know just where to look, and monthly maps for the purpose appear in Astronomy Now, Sky & Telescope and other quality magazines, which these days can be obtained from most newsagents or consulted at most libraries. Uranus was discovered by Herschel in 1781, Neptune in 1846 as a result of its gravitational effects on Uranus. But Neptune was observed by Galileo, passing Jupiter, though he didn’t recognise it as a planet – so it can be seen by small telescopes!
If the Earth had no atmosphere, life would be much easier for astronomers – as long as they didn’t need to breathe. (As observatories are built at greater and greater heights on mountaintops, astronomers who suffer from altitude sickness are becoming more separated from those who don’t…) Blue light is scattered and absorbed, making the Sun look red near the horizon; but as it gets lower it seems to slow down in its descent, and its disc seems to become flattened at the bottom. This is one of the major effects of refraction.
Refraction
Refraction is the process which makes a stick look bent when it’s thrust into water. The cause is that while light travels in straight lines, both in air and in water, it travels through the denser medium slightly more slowly. (The speed of light in vacuum is the top speed limit of the Universe, but the characteristic blue glow round water-cooled nuclear reactors is caused by particles travelling faster than the speed of light in water.) As light crosses the interface between air and water, the change of speed causes it also to change direction. The same thing happens between air and glass: magnifying glasses, spectacles and refracting telescopes wouldn’t work otherwise.
Our atmosphere is always in motion, and it’s refraction which makes the stars seem to twinkle – in space, there’s no such effect. When a pressure wave in the air passes between us and the star, the light path is moved around twice, according to the branch of modern mathematics called ‘catastrophe theory’. The old verse ‘Twinkle, twinkle, little star’ is literally true. Sirius, the brightest star in the sky, has its light split into component colours and flashes red, green and blue; and because the planets show discs, however small, we see them as relatively steady.
But the nearer any object is to the horizon, the more refraction seems to displace it upwards – hence the flattening effect on the relatively large disc of the Sun. Variations in atmospheric temperature, and dust and water content, can change the value of refraction dramatically near the true horizon (zero degrees altitude), as events have demonstrated over the years at the stone circle I built in Glasgow. We’re not so aware of refraction with the Moon, but it shows dramatically in a Moonrise photo taken from Earth orbit. One consequence of it is that the Sun and the Full Moon can sometimes be seen on opposite horizons at the same time, even during lunar eclipses when they have to be diametrically opposite and the Moon shouldn’t be fully visible until the Sun has fully set.
With stars and planets, even if we know in theory where they should be in the sky, and the telescope can be preset with setting circles (or these days, ‘Go To’ electronics) to point there, we still need a ‘finder telescope’ to zero in on the target. The higher the magnification by the telescope, the greater the need.
A finder telescope has a relatively low magnification, so that it can take in a larger area of sky around the target, making it easier to find and centre. This can be done using setting circles, especially if the target is in an unfamiliar part of the sky or really faint, but for most purposes it will be enough to aim the telescope roughly by eye. The finder telescope is then used to pinpoint the target – either directly, or in relation to the surrounding stars if it’s still too faint to be made out.
The finder may be fitted with cross hairs or a pointer; some models can be illuminated so that the guides can be seen against a really dark sky (which makes all but the brightest targets hard to see.) But what is essential is that the finder is aligned parallel to the central axis of the telescope, so that when the target is on the cross-hairs it is in the much smaller field of the main instrument. In setting a finder, the trick is to start with some large, fixed target like a distant building, then the Moon, relatively easy to find without one. Once that is centred in the telescope, the finder can be adjusted to match.
Telescope Mounts
There are two standard mountings for telescopes. The altazimuth mount moves straight up and down (in altitude) and right to left (in azimuth). It’s simple, but it isn’t the way the heavenly bodies cross the sky unless you happen to be at the north or south pole, or the equator. For the rest of us, the most effective telescope mount is the equatorial. This is aligned parallel to the Earth’s axis at the observing site, so that the target can be followed in right ascension (east to west across the sky) while the telescope is fixed in declination, which corresponds to latitude on Earth, projected on to the sky. With setting circles, you can point the telescope to the right ascension and declination of your target, as long as you know the precise local sidereal time – which is not the ordinary time of day, because we tell time by the Sun, not the stars – and then you’d still have to correct for refraction, which takes effect in altitude, so you still have to use the finder. With practise, making the corrections becomes easy, even though their exact size varies with the conditions from night to night. Some call this ‘getting the feel of the telescope’; others call it ‘learning the instrument’. It takes a while, but it repays the effort.
Check out Duncan Lunan’s Beginner’s Guides to Astronomy and his monthly star maps.


Leave a Reply